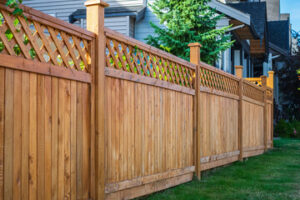
Fences add privacy, define property lines and are a great way to boost your home’s resale value. Fence Installation Lansing MI varies in cost depending on style and material.
Before starting to build your fence, you should identify your property lines. This will help ensure that your fence is built correctly, and it will prevent future disputes with neighbors and city officials. You can do this by looking at your property survey, which should be available at your local land registry office or included in your home purchase papers. Additionally, you should check with your homeowner’s association to see if there are any covenants that dictate the style of your fence.
Once you’ve identified your property line, use a shovel or rake to clear any large rocks or debris that might stand in the way of building your fence. You should also level the ground along the fence line to ensure that it is straight and stable. If the ground is uneven, it could cause your fence to become crooked or insecure over time. You can use a tamper or roller to compact the earth, which will improve its strength and facilitate the construction process.
Next, clean your fence panels and let them dry for several days. Once they’re dry, apply a coat of primer to all panels. You can paint the panels by hand or use a power sprayer. It’s important to choose a high-quality primer, as it will affect how the finished product looks. If you’re using a paint sprayer, be sure to back-brush every couple of feet to ensure even coverage and avoid lap marks.
Once the primer has dried, you can start staining your fence. If you’re using a roller, work from the top down. Use horizontal strokes for horizontal panels and vertical strokes for vertical ones. Once you’re done, use a brush to touch up any areas you miss or to get into corners and between slats.
Materials
Before you buy your fence materials, consider the look you want to achieve. For example, do you want a space between each board or do you prefer a tight and even appearance? Then find boards that will fit the look you want and have the strength you need. Once you have the boards, you can either nail or screw them into place. Be sure to use galvanized nails, as this will help prevent corrosion.
Depending on your budget and the environment in which your fence will be placed, you may also want to purchase or rent other tools. For example, a gas-powered earth auger will speed up the process of digging holes for posts and can create standard size hole in most types of soil.
You will need to dig a post hole that is about 1/3 of the length of the post. This is necessary to avoid frost heaving, which occurs when water in the soil freezes and thaws, pushing the posts out of the ground. If you live in a cold climate, a concrete footing is recommended.
When digging your hole, be sure to check for underground pipes and utility lines using a free service offered by most local utilities companies. It is important to do this before starting any work in order not to hit a line or cause damage to the property.
Once your posts are set, it is time to add the panels or pickets to the fence. When installing the panels, be sure to make sure that they are level and all at the same height. You can check this by placing a level along the edge of the panel and making sure that it is straight.
Installing the Posts
The first step in installing a fence is to locate the posts. This can be done by driving a long, heavy wooden stake into the ground a few feet past where you want to place each end or corner post. Then, stretch a length of string from one of the end stakes to another so you can mark the location for each additional post. This method makes it easy to keep your fence in perfect alignment throughout the entire project.
Once you’ve marked the position for your posts, dig the holes with a manual post hole digger or auger. A standard rule is to dig them to a depth of about a third of the post’s length, but your local building codes may require a greater depth. To make sure the posts will stay stable once they’re buried, add a layer of gravel to the bottom of each hole. This aids drainage and slows moisture damage to the wood posts.
You should also apply a wood preservative to the exposed ends of each post. This hinders rot from the damp soil and will protect your investment for years to come. Choose a wood preservative that is labeled as suitable for use in ground contact, such as western juniper, ponderosa pine, douglas fir, or cedar.
Once you’ve poured the concrete, it should be allowed to set for several hours before proceeding with the next steps. Using a two-sided post level, check each post to ensure it is plumb. Using a level helps you avoid expensive repairs or replacements later on in the life of your fence. When you’re finished, remove the level and replace the tops of the posts with caps.
Installing the Rails
Depending on the style of fence, there are several different ways to install the rails. For example, some styles of fence have the top and bottom rails set a certain distance apart from each other, while others require the posts to be spaced evenly apart from one another. Whatever style of fence you choose, be sure to follow the manufacturer’s instructions on how to correctly mount the rails to the posts.
When building a post and rail fence, it’s a good idea to use a power drill with a bit to pre-drill each hole before pouring the concrete. This will help ensure that the holes are deep enough to properly anchor the posts. After the concrete has cured, you can install the rails. Ideally, you should use a post level to make sure that the rails are straight and plumb.
It is also important to consider any zoning laws that may apply to your property before you begin the installation process. You will also want to be aware of any underground utility lines that might be located in your yard. It is a good idea to call 811 before starting any construction on your fence to have all the underground lines marked for free.
Once you’ve installed the posts and rails, it’s time to add the finishing touches to your fence. You can paint the fence any color to match your house or add a stain to enhance its longevity. Cedar, for instance, is highly durable and requires little maintenance. However, it’s still a good idea to apply a wood preservative like Cutek CD 50 to prolong the life of your fence.
While installing a fence is possible as a DIY project, it’s often best to leave it to the professionals. Professionals have years of experience and can complete the job quickly and accurately. In addition, they can help you find the perfect fence for your property and ensure that it complies with local laws.
Finishing
Once all the posts and rails have been set, it’s time to start installing fence panels. Start at one end of the fence line and position your first panel, ensuring that it’s properly anchored to the post and aligned with the rest of the fence. Repeat the process for the remaining panels, making sure that they are all evenly spaced and attached securely.
If your fence will include a gate, it’s a good idea to install the gate posts now as well. This will make the gate much easier to open and close. Depending on the type of gate you are installing, this may require dedicated gate posts or the use of your existing posts. Once the gates have been installed, it’s a good idea to apply a weatherproof sealant to prevent moisture from damaging the wood.
Before starting work on the fence, it’s a good idea to check local building codes and regulations regarding fence installations in your area. Some neighborhoods or municipalities may have specific height restrictions, setback requirements, and materials guidelines that need to be followed.
This is an important step to complete before beginning construction because failure to do so could result in fines or the forced removal of your new fence. It’s also important to obtain any necessary permits before commencing construction on the project. This will ensure that the fence installation is completed according to state and local regulations and will not pose any safety hazards. A permit will also help to avoid potential delays in completing the project.