Author: Bertie Carlson

Preventative Measures for Foundation Repair

Foundation problems can be expensive to repair, especially if left unchecked. Preventative measures can help reduce the cost of repairs and extend the life of your home.

Foundation Repair

Cracks, sagging floors and doors that stick are all signs of excessive or uneven settlement. Bringing your home back to its original elevation stops more damage, closes the cracks and restores functionality. Contact Foundation Repair Greensboro NC for professional help.

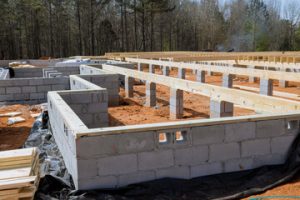
Foundation piers are installed underground to support the structure of your home. They are tall, cylindrical supports that look like the columns on a plantation-style home’s front porch. They can be made of steel or concrete. A contractor digs holes for them in the ground and then pours concrete in order to firmly anchor the piers in place, or they can be hydraulically pressed into the soil using a mechanical lift system. After they are in place, a contractor will use their equipment to raise your sunken foundation and make sure it is back at its original elevation.

When a foundation sinks, it causes everything in your home to shift and become off-kilter. This can lead to cracks in walls, doors that won’t open and close, and uneven or sloping floors. Foundation repair returns your home to its original elevation, which will close up the cracks, re-align the doors and windows, and help your home work the way it was intended to.

Many foundation repair experts will recommend slab piers for modern concrete slab-type homes, especially in situations where the issue has to do with soil with low weight-bearing capacity or drainage problems that have washed away portions of the ground underneath your foundation. Slab piers are a permanent solution that will not need to be replaced, unlike other “fixes” on the market. They’re also less invasive than other options and aren’t as expensive as many other foundation repair methods. In addition, they’re able to handle heavier loads than other solutions, so you won’t have to worry about your foundation becoming unstable in the future. They’re also ideal for supporting retaining walls and decks.

Slab Jacking

Slab jacking is a concrete repair process that raises sunken or uneven concrete slabs like driveways, sidewalks, patios, and foundation floors. It is much less invasive than replacing the concrete and is often more cost-effective. This technique is ideal for fixing minor to moderate damage to concrete, as it stabilizes the surface and fills gaps to prevent further damage. It is best used in stable soil conditions with minimal moisture and organic material that could compromise the concrete.

During the slab jacking process, we use hydraulic pressure to drill small holes into the slab. Then, we pump a thick mixture of cement and other ingredients underneath the slab. This mixture lifts the slab and fills any voids to restore it to its original position. The drilling and slurry injection are performed quickly with minimal impact to the surrounding area. Once the slab is raised, we patch and clean the site, leaving little evidence of a repair apart from your newly level slab!

While the slab jacking process is similar to mudjacking, there are some key differences. Mudjacking involves using a mud-like material to lift the concrete slab, but it is less precise than poly slab jacking. Additionally, mudjacking cannot lift foundations or other intact concrete structures. It is also not recommended for areas where the sinking concrete is caused by extensive tree roots.

Unlike mudjacking, poly slab jacking uses a high-density polyurethane foam that is lightweight yet incredibly strong. It is also resistant to water, chemicals, and erosion. The polyurethane foam also has the added benefit of being eco-friendly and a safer alternative to traditional grout. The quick installation time means that you can return to your home or business almost immediately after the process is complete, with minimal disruption.

Masonry Patches

Masonry surfaces are susceptible to two primary problems: physical damage and surface degradation, commonly called efflorescence. In order to address these issues, the surface must be cleaned and repaired properly. This is done by removing the deteriorating material and cleaning the surface to allow for a proper bond between the substrate and the patch. In some cases, a waterproofing membrane can be installed to protect the masonry structure from moisture intrusion and to improve the appearance of the surface.

When repairing cracks in brick walls, chimneys, sills or steps, first use a cold chisel and hammer to undercut both sides of the crack and then clean out the damaged mortar. Next, place a concrete adhesive into the crack to help bond the patching material to the existing masonry. This will also prevent the patching material from cracking and failing during the freeze-thaw cycle.

Typically, the best material for brick repair is a pre-mixed masonry patching compound that matches the surrounding surface and is ready to use. These products can be applied in a variety of thicknesses and can be used in conjunction with an expansion joint. They are available in a range of finishes and can be color matched as well.

Using a stone patching material such as akemi may be another option for some masonry restoration contractors. These products can be used in a wide range of temperatures and provide a strong, durable and carvable repair. These products can be color matched for a more professional appearance as well. Latex modifiers are sometimes added to these materials to improve their workability, durability and resistance to the elements.

Concrete Patches

Concrete patching is used to fill cracks and gaps in damaged concrete, but it is not intended as a long-term structural solution. The type of concrete patch used should be carefully evaluated to ensure that it is appropriate for the specific project, and material compatibility with existing concrete should be a primary consideration.

Before applying concrete patch, the surface should be thoroughly cleaned to remove any debris that may prevent adhesion. A pressure washer with a low PSI rating can be effective for this purpose, but it is important to avoid using a sprayer that produces water droplets.

After the surface is clean, it should be lightly misted with water and covered with damp burlap or plastic sheeting to help it retain moisture during curing. It is also a good idea to cover the area with a tarp during wet weather to protect it from moisture that may cause the patch to lift.

Before concrete patch is applied, a bonding agent should be used to promote adhesion between the new concrete and existing concrete. Concrete adhesives are available in a variety of forms, from liquid to powder. These products are usually easy to use and can be mixed with water. A general-purpose concrete adhesive is SureBond, which comes as a milky fluid that can be applied to the work area with a brush.

After the bonding agent has been applied, concrete patch can be mixed and troweled into place. Once the concrete has set, it should be smoothed with a metal or wooden float to provide a more finished appearance. It is essential that the concrete patch is protected from traffic and moisture during the curing process.

Steel Piers

Steel piers (also called ECP foundation piers) are high-strength, cylindrical steel components that are driven into the ground using hydraulic equipment. While less common than concrete piers, this support option can be just as effective for stabilizing a home or business. They can also be used for a wider range of foundation sizes and types than concrete piers, making them an excellent choice for commercial properties.

Like other pier repair methods, the installation of steel piers depends on many factors, including soil conditions and the building’s weight. A qualified engineer or foundation specialist should assess a foundation to determine the proper method of repair.

If you’re experiencing signs of a foundation problem, your expert may recommend that you use piers to support the structure and prevent further movement. Cracks in walls or floors, uneven or sloping floor levels, and difficulty opening doors and windows are all common signs of foundation settlement that can be corrected with the addition of steel piers.

Unlike concrete piers, steel piers are resistant to soil movement and are less affected by moisture swelling. They can also be installed to an exceptionally deep depth, which makes them a great solution for homes or businesses that are located on challenging soils.

Like helical piers, hybrid pressed concrete piers (also known as helical-steel hybrid piers) are a good option for repairs that require both structural integrity and affordability. This is because they combine the strengths of both steel and concrete for a stronger, more durable support system. Like helical piers, pressed concrete piers are driven into the ground by hydraulic equipment until they reach load-bearing soil. They are then connected to the foundation with steel brackets and locked in place with steel cable. Once the piers are in place, they’re load-tested to ensure that they can withstand the full weight of your structure.

Protect Your Property With Expert Rodent Exclusion

Rodents can cause extensive damage by chewing through wires, insulation, and structural components. In addition, they carry many diseases that can be transmitted to people. Traditional rodent control relies on reactionary measures like poison and traps.

Exclusion services prevent infestations in the first place, saving property owners money and hassle. This article will explore the benefits of partnering with your local experts for proactive rodent exclusion. Read on or Find Out More Here.

rodent control

Sealing Entry Points

Rodents are persistent, resourceful pests that can chew through anything to gain entry into your home. They are attracted to warmth and food sources, which is why they often seek shelter in homes and garages. They also seek out areas that offer easy access to water and food, like basements and attics. Rodents can cause significant damage, chewing through insulation and drywall to reach wires, causing costly repairs and creating safety risks. Sealing gaps and cracks can prevent rodents from gaining entry and protect your property from damage.

When using expert rodent exclusion, a thorough inspection is performed to locate all potential cracks, holes, and gaps. Then, these openings are sealed with caulk, steel wool, and even cement to make it impossible for rats or mice to enter. Door sweeps, vent covers, and chimney caps are also installed to block entrances into your home or building. Other steps, like storing garbage in rodent-proof containers and reducing clutter, can help discourage rodents from seeking out hiding spots and food sources in your property. Keeping up with regular inspections and maintenance is key to discovering new vulnerability points that can emerge over time. This proactive approach to rodent control is cost-effective, effective, and provides health and property protection. It is the best way to prevent rodent infestations before they get out of hand.

Preventing Damage

Rodents can wreak havoc inside a home through chewing wires, destroying insulation, and burrowing. They also spread diseases through contaminated food and bites. Often, homeowners’ insurance does not cover the costs of rodent infestation cleanup and repair. This is why it’s important to invest in rodent exclusion services.

Typically, an exclusion service begins with a detailed inspection of the property. The pest control technician will look for signs of rodent activity and identify any entry points. Based on this information, the pest control professional will develop a customized plan. This may include sealing gaps, cracks, and holes, as well as repairing siding, vents, and other structural deficiencies with materials like steel wool, caulk, and weatherstripping.

Other preventative measures include installing door sweeps on all exterior doors, utilizing dryer and stove vent covers, and putting in chimney caps. Trimming vegetation and regular inspections will help as well, as rodents often seek shelter in overgrown shrubbery.

Rodent exclusion is considered an eco-friendly method of pest control because it relies on physical barriers rather than chemical treatments and traps. In addition, it significantly reduces the need for ongoing cleanup and repairs. This is especially beneficial for commercial properties, where rodents can be a serious threat to the health and safety of employees and customers. This type of proactive approach can also protect a business’s reputation.

Maintaining Effective Exclusion

Rodent exclusion is the most effective long-term method for protecting homes from rodent infestations. While trapping and baiting can eliminate existing populations, exclusion prevents new rodents from entering in the first place. The process of exclusion involves identifying and sealing entry points that allow rodents into the home, such as cracks in foundation walls, gaps around windows and doors, and openings where pipes or wires enter the house. Because mice and rats can squeeze through holes as small as a dime, thorough inspection and sealant are necessary to keep them out.

When combined with other measures, such as trimming vegetation, storing firewood and trash away from the home, and removing hiding places, rodent exclusion can provide homeowners with unparalleled protection. However, a well-established infestation might require additional intervention in the form of trapping or baiting techniques to reduce the population.

Rodents are notorious for spreading disease and causing extensive damage to property by chewing on electrical wires, insulation, and furniture. Exclusion can help protect the health and safety of homeowners by keeping them safe from these diseases and reducing the need for chemical treatment and poisons. Additionally, rodent exclusion is considered an eco-friendly pest control solution because it relies on physical barriers rather than chemicals and traps. With regular inspections and maintenance, this sustainable method can be a lasting defense against rodents.

Keeping Rodents Out

Rodents can chew through wires, causing costly damage and increasing the risk of electrical fires. Their presence also poses a health threat as they spread disease and bacteria such as hantavirus, salmonella, and others through their feces, urine, saliva, and droppings. Routine inspections can identify potential threats and provide the preventative measures needed to keep pests out.

Rodents can squeeze through openings the size of a dime or quarter, making it essential to inspect both inside and outside your home or building. Our professionals can find and seal these tiny entry points using caulk, steel wool, or hardware cloth to block mice and rats from accessing your space. In addition, we can install door sweeps, weather stripping, and insulation to prevent rodents from accessing your garage or barn.

Keeping your property free of food and water sources is also important to keep rodents away. Store all food in airtight containers, clean up crumbs and spills promptly, and use garbage bins with tight-fitting lids. Regularly trim trees and shrubs, and remove overgrown weeds or vegetation that can serve as hiding spots for rodents. Incorporate plant species that deter rodents into your landscape, like mint, lavender, and marigolds. And always take out the trash regularly. These preventative measures, combined with a proactive approach to rodent exclusion, will help keep your property free of pests and their expensive consequences.

Mold Removal – How to Get Rid of Mold in Your Home or Office

Mold is more than an unsightly nuisance; it can also be a health hazard for the occupants of a building and can damage materials and structures. This is why it’s important to find effective solutions to deal with the problem as soon as possible. Contact Mold Removal Salt Lake City for professional help.

Mold Removal

Before proceeding to the cleaning, always put on rubber gloves and a face covering to avoid direct contact with mold spores.

Once the source of the mold is found and the water issue is fixed it’s time to begin the clean up. This can be done by either a professional or, for smaller areas, it is possible to do on your own. The first step in cleaning up mold is to wipe the visible surfaces. This can be done with a damp cloth or with a mixture of oxygen bleach and hot water. Pour the solution into a spray bottle and saturate the area. Allow it to sit for 10-15 minutes and then wipe it clean. The area should then be air dried. This can be done with a hair dryer or room fan, and it’s important to keep the windows and doors open.

The next step is deeper cleaning and scrubbing. This is where products like vinegar or clear ammonia come into play. They can penetrate the surface of porous materials such as drywall and wood, removing hidden spores. It’s also a good idea to use a cleaning product specifically formulated for mold as these tend to be more effective than standard household cleaners.

When using vinegar or any other cleaning agent, it’s always best to wear rubber gloves and a face mask to prevent inhalation. Also, never mix ammonia with any other chemical as it can produce poisonous gas. For more stubborn stains, try mixing baking soda with water to make a paste and scrub the area. Be sure to rinse and dry thoroughly.

For more serious issues, it may be necessary to use a mold-removal kit or antimicrobial cleanser. This type of cleaner contains chemicals such as sodium hypochlorite (bleach) or formaldehyde that penetrate the surface of the material to kill the spores. It’s always a good idea to hire a professional for this type of remediation.

Regular cleaning and inspections will help to stop future mold growth by preventing the accumulation of organic material, which is what causes the spores to grow. It’s also important to regularly dust and vacuum. This will prevent the buildup of dust and other debris, which can trap moisture and cause new growth.

Remove the Infected Materials

The next step of mold removal is to remove any infected materials from the affected areas. This is the most intensive part of a cleanup and it involves removing porous materials, like carpet or fabric, that can’t be cleaned, as well as non-porous materials, such as wood and drywall, if they are infested with mold. The items are bagged and thrown away to reduce the risk of spreading mold spores.

To limit the spread of mold spores during this step, it’s best to isolate the work area and cover any vents that can’t be covered. Closing doors and hanging plastic sheeting between the affected and unaffected areas is also helpful. Using a fan to pull contaminated air away from the area and exhausting it outdoors can help as well. A HEPA filter on a vacuum cleaner can reduce the amount of mold spores that are redistributed when cleaning.

Mold can be damaging to the materials it grows on and can also cause health effects for occupants. People with asthma, allergies, or other respiratory conditions should avoid any area where mold is present. If an individual’s symptoms worsen after being in a moldy environment, they should contact their healthcare provider.

It’s important to check and fix any water leaks in the property as soon as possible to prevent future problems with mold. Any wet materials should be dried as quickly as possible using dehumidifiers, wet/dry vacs and fans. It’s a good idea to use an EPA-approved fungicide on any porous or semi-porous items that are infested with mold. Non-porous materials should be scrubbed with soap and water to ensure they are clean and sanitized.

Many items that are damaged by mold can be saved if the situation is caught early. However, it’s important to have a professional mold inspection and mold cleanup before trying to save any items to make sure that the mold is fully eradicated. This also ensures that the property is safe for prospective buyers or renters. Regular health checks can also stop mold from recurring after the cleaning process is complete.

Disinfect the Area

Mold spores can become airborne, irritating the nose, eyes, and throat of anyone exposed to them. These spores can also trigger asthma and other respiratory problems in sensitive individuals. As such, it is important to clean and disinfect surfaces affected by mold.

Chlorine bleach can kill mold on hard non-porous surfaces such as sinks, tubs, and tiles. It can also be used to wipe off wood and drywall that is infested with mold. Before using bleach, be sure to read the product label and follow the manufacturer’s directions for use. Bleach can irritate the skin, eyes, and throat and should be avoided if possible by those with sensitivities.

Clorox Disinfecting Bleach and Tilex Mold & Mildew Remover both contain the chemical sodium hypochlorite (bleach), which is effective at killing mold. These products can be purchased at most grocery stores and hardware stores. Both products are recommended for use on areas that are heavily infested with mold and should be wiped down thoroughly with a cloth or sponge to ensure that all the spores are removed.

White vinegar is another natural and effective way to kill mold. It can be sprayed directly onto the surface and scrubbed with a brush. After scrubbing, the area should be rinsed with water and left to dry completely. If the mold is very stubborn, a mixture of equal parts white vinegar and water may be applied to the area.

Ammonia can also kill mold on hard non-porous areas, but should be used with care because it is a harsh and toxic substance. Ammonia can also cause dermatitis in sensitive individuals. A safer alternative is to mix a solution of 50% clear ammonia and 50% water in a spray bottle and apply it to the surface.

The most effective natural solution to kill mold is tea tree oil, a powerful antifungal agent that can be found at many health food stores. It is derived from the plant Melaleuca Alternifolia and should be added to a water solution in a ratio of 1 teaspoon oil per cup of water.

Clean the Air

Using a dehumidifier to lower moisture levels is a good idea when dealing with a mold problem. It reduces the likelihood of future mold growth and re-contamination. Also, a professional can use more advanced equipment like a thermal imaging camera to detect hidden moisture behind walls and under floorboards. This information can be extremely useful in identifying and repairing the source of the moisture.

Most importantly, you must take the time to dry the affected areas. The use of wet/dry vacs, dehumidifiers and fans will expedite the process, as materials dried within 24-48 hours will not be able to grow mold. Porous materials such as drywall and insulation should be bagged and discarded if they are moldy.

For larger patches of mold, you can use common household products to kill the fungus and prevent further growth. The best choice is a mixture of white vinegar and hydrogen peroxide. These natural substances are effective at killing both the visible spores and the underlying roots that often go untreated.

Make sure to wear personal protective equipment (PPE) such as a respirator, gloves and non-latex, vinyl or nitrile rubber gloves while handling moldy items. Mold spores can be inhaled or ingested, resulting in a range of symptoms including sneezing, runny nose, coughing, itchy eyes, rashes and other irritations.

Mold removal can be a daunting task, but it’s vital to protect your health and the safety of those living or working in the affected area. If you’re unsure of what to do or need assistance with mold cleanup, contact a local mold remediation company. They have the training and experience to safely and effectively clean up mold and can advise you on the best preventative measures to take in order to keep the problem from recurring. They will also be able to identify the source of the mold and recommend the corrective action necessary. Depending on the severity of the mold, this may include repairs to plumbing or the structure itself. It could also mean removing carpeting, drywall and other building materials. Then the area can be cleaned, disinfected and re-inspected for any signs of mold.

The Basics of Water Damage Restoration

Water Damage Restoration Oklahoma City is a serious and time-consuming task. Homeowners often hire a professional to handle the entire project, from cleaning and drying to removing broken possessions and doing major construction repairs.

Water Damage

The first step is to assess the damage and ensure safety. Make sure the electricity is turned off and that all items with electrical components are moved to another room.

The first step in any water damage restoration is the removal of excess water from the affected area. This can be done in a few different ways, depending on the scale of the problem and the available tools. Smaller jobs may be able to be handled by simply pumping out the water, while large commercial fans and dehumidifiers can be used in larger areas to help speed up the drying process. It is also helpful to open windows and doors to allow for air circulation, which can help the water to evaporate more quickly.

The next step is to check for any structural damage caused by the water. It is important to note that the longer that water is allowed to remain in a building, the more damage it can cause to both the structure and its contents. This is why it is critical to call a professional immediately if you believe that your home has sustained water damage.

It is also important to turn off any electricity in the affected area. If the power is left turned on, it could create an electrocution risk if water gets into outlets and touches exposed wires. It is also recommended to remove any furniture or other items from the affected areas that can be saved, and take them to a safe place until the restoration company can arrive.

Once the majority of the water has been removed, it is then time to dry out the remaining area. This can be done in a number of ways, including using wet/dry shop vacuums, large commercial fans and dehumidifiers, opening windows to allow for the passage of air (which will help with evaporation), and simply throwing towels on top of puddles to absorb some of the excess water.

It is also a good idea to inspect the walls and carpet for any moisture pockets. It is not uncommon for these pockets to contain mold, which can be dangerous to one’s health. It is important to have these pockets identified and addressed as soon as possible, as this will prevent long-term issues such as wood rot and mold growth.

Drying

Drying the affected area is the next step of a water damage restoration project. This is one of the most crucial steps, especially if there are any structural components that may have been compromised by the excess water. If it is safe to do so, a professional will open up all of the windows and doors in the room or areas that have been affected by the water damage and set up fans and dehumidifiers to help improve air circulation.

This will allow moisture to be drawn away from the structure and into the outdoor environment where it can naturally evaporate. This will also help to prevent the formation of mold and mildew that thrives in moist conditions.

In more serious cases, professionals will use specialized drying equipment such as air movers and dehumidifiers to remove the moisture from the air in the affected area. This will take some time, but it is vital to the success of a restoration project.

Depending on the extent of the water damage, a professional may need to test the humidity levels in the area with a device called a psychrometric gauge. This will help them determine the moisture content in the air and how much longer it will take for the area to dry completely.

After the moisture level has been tested and the area has been dried out, any soiled fabrics or materials should be cleaned with a disinfectant that is specifically designed for cleaning fabrics that have been exposed to water. It is important to clean these items immediately after the water damage occurs in order to avoid any mold or mildew growth.

In some cases, professionals will need to replace carpeting, drywall and other damaged items that have been saturated by the excess water. This is especially true if the wood in a home has been soaked through to the subflooring. This is a job that is best left to professionals who will ensure that all moisture has been removed and the wood is dry before it is replaced. The longer that wood remains saturated, the more extensive and costly the repairs will be.

Cleaning

Once the source of water has been turned off and the contents removed, it’s time to begin cleaning and sanitizing. Depending on the type of water damage, this may be as simple as wiping down surfaces with a disinfecting agent or it may require more extensive work such as removing insulation and drywall to scrub and rinse off contaminants. This step of the process is where professional restoration services come in handy since they have a range of special tools and techniques that aren’t available to homeowners.

Before starting cleanup and sanitization, make sure to assess the area for safety hazards. It is imperative to turn off any electricity or gas that may have been affected by the water and wear proper PPE such as gloves, masks, goggles, and protective footwear. This can prevent electrocution and other hazardous side effects from contaminated water.

After assessing the area, it’s important to get as much of the water out as possible to avoid long-term issues such as mold and mildew. This can be done by using a wet/dry vacuum, mop, towels, and fans to get the excess moisture out of the area. It is also a good idea to open windows and doors, if possible, to allow for airflow and speed up the drying process.

If any items have sustained water damage and can’t be washed or disinfected, it is best to throw them away. This includes mattresses, carpeting, rugs, cosmetics, books, baby toys, and upholstered furniture. In addition, if the water came from sewage or flood waters, it’s important to check with local authorities for proper disposal instructions.

It’s always a good idea to hire professionals for the clean-up and sanitation process. They have the tools and training to remove any water, disinfect, and deodorize affected areas. They can also help with the repairing and reconstruction phase to return the building to its initial livable standard.

Repairing

Water damage repair is an essential process that must begin as soon as possible to preclude further damage. It can also significantly reduce the overall cost of restoration.

After assessing the extent of the damage, the water damage repair company will determine how much work is needed to get your home back to normal. They will start by removing all the standing water. This can be done using powerful vacuums and pumps that can remove gallons of water in one go. They will then dry out the affected area. This can be done by removing carpets and drywall, or by using dehumidifiers and fans. They will also disinfect anything that has come into contact with the water, to ensure any bacteria is eliminated.

The next step is to determine what can be saved and what must be replaced. This is a crucial process, as it will help the water damage restoration company to prevent further problems down the line. For example, if the walls or carpets have been saturated by water for an extended period of time, they will need to be removed and replaced. It is also a good idea to remove any items that have been severely warped or moldy, as these can be difficult to restore.

Once the contaminated materials have been removed, the water damage restoration company will begin to clean and sanitize the affected areas. They will use specialized cleaning products to eliminate any bacteria and other harmful substances that may be present in the water. Then, they will dry out the area by opening windows and using fans to promote air flow. This will help the drying process to progress more quickly and prevent further damage to your home.

If the structural components of your house have been impacted by water, the water damage restoration company will need to replace them. This can be a complicated process and will depend on the type of water that caused the damage. For example, gray or black water damage requires more advanced techniques to clean and may require a different process than clean water damage.

How to Properly Install a Fence

Fences add privacy, define property lines and are a great way to boost your home’s resale value. Fence Installation Lansing MI varies in cost depending on style and material.

Fence

Before starting to build your fence, you should identify your property lines. This will help ensure that your fence is built correctly, and it will prevent future disputes with neighbors and city officials. You can do this by looking at your property survey, which should be available at your local land registry office or included in your home purchase papers. Additionally, you should check with your homeowner’s association to see if there are any covenants that dictate the style of your fence.

Once you’ve identified your property line, use a shovel or rake to clear any large rocks or debris that might stand in the way of building your fence. You should also level the ground along the fence line to ensure that it is straight and stable. If the ground is uneven, it could cause your fence to become crooked or insecure over time. You can use a tamper or roller to compact the earth, which will improve its strength and facilitate the construction process.

Next, clean your fence panels and let them dry for several days. Once they’re dry, apply a coat of primer to all panels. You can paint the panels by hand or use a power sprayer. It’s important to choose a high-quality primer, as it will affect how the finished product looks. If you’re using a paint sprayer, be sure to back-brush every couple of feet to ensure even coverage and avoid lap marks.

Once the primer has dried, you can start staining your fence. If you’re using a roller, work from the top down. Use horizontal strokes for horizontal panels and vertical strokes for vertical ones. Once you’re done, use a brush to touch up any areas you miss or to get into corners and between slats.

Materials

Before you buy your fence materials, consider the look you want to achieve. For example, do you want a space between each board or do you prefer a tight and even appearance? Then find boards that will fit the look you want and have the strength you need. Once you have the boards, you can either nail or screw them into place. Be sure to use galvanized nails, as this will help prevent corrosion.

Depending on your budget and the environment in which your fence will be placed, you may also want to purchase or rent other tools. For example, a gas-powered earth auger will speed up the process of digging holes for posts and can create standard size hole in most types of soil.

You will need to dig a post hole that is about 1/3 of the length of the post. This is necessary to avoid frost heaving, which occurs when water in the soil freezes and thaws, pushing the posts out of the ground. If you live in a cold climate, a concrete footing is recommended.

When digging your hole, be sure to check for underground pipes and utility lines using a free service offered by most local utilities companies. It is important to do this before starting any work in order not to hit a line or cause damage to the property.

Once your posts are set, it is time to add the panels or pickets to the fence. When installing the panels, be sure to make sure that they are level and all at the same height. You can check this by placing a level along the edge of the panel and making sure that it is straight.

Installing the Posts

The first step in installing a fence is to locate the posts. This can be done by driving a long, heavy wooden stake into the ground a few feet past where you want to place each end or corner post. Then, stretch a length of string from one of the end stakes to another so you can mark the location for each additional post. This method makes it easy to keep your fence in perfect alignment throughout the entire project.

Once you’ve marked the position for your posts, dig the holes with a manual post hole digger or auger. A standard rule is to dig them to a depth of about a third of the post’s length, but your local building codes may require a greater depth. To make sure the posts will stay stable once they’re buried, add a layer of gravel to the bottom of each hole. This aids drainage and slows moisture damage to the wood posts.

You should also apply a wood preservative to the exposed ends of each post. This hinders rot from the damp soil and will protect your investment for years to come. Choose a wood preservative that is labeled as suitable for use in ground contact, such as western juniper, ponderosa pine, douglas fir, or cedar.

Once you’ve poured the concrete, it should be allowed to set for several hours before proceeding with the next steps. Using a two-sided post level, check each post to ensure it is plumb. Using a level helps you avoid expensive repairs or replacements later on in the life of your fence. When you’re finished, remove the level and replace the tops of the posts with caps.

Installing the Rails

Depending on the style of fence, there are several different ways to install the rails. For example, some styles of fence have the top and bottom rails set a certain distance apart from each other, while others require the posts to be spaced evenly apart from one another. Whatever style of fence you choose, be sure to follow the manufacturer’s instructions on how to correctly mount the rails to the posts.

When building a post and rail fence, it’s a good idea to use a power drill with a bit to pre-drill each hole before pouring the concrete. This will help ensure that the holes are deep enough to properly anchor the posts. After the concrete has cured, you can install the rails. Ideally, you should use a post level to make sure that the rails are straight and plumb.

It is also important to consider any zoning laws that may apply to your property before you begin the installation process. You will also want to be aware of any underground utility lines that might be located in your yard. It is a good idea to call 811 before starting any construction on your fence to have all the underground lines marked for free.

Once you’ve installed the posts and rails, it’s time to add the finishing touches to your fence. You can paint the fence any color to match your house or add a stain to enhance its longevity. Cedar, for instance, is highly durable and requires little maintenance. However, it’s still a good idea to apply a wood preservative like Cutek CD 50 to prolong the life of your fence.

While installing a fence is possible as a DIY project, it’s often best to leave it to the professionals. Professionals have years of experience and can complete the job quickly and accurately. In addition, they can help you find the perfect fence for your property and ensure that it complies with local laws.

Finishing

Once all the posts and rails have been set, it’s time to start installing fence panels. Start at one end of the fence line and position your first panel, ensuring that it’s properly anchored to the post and aligned with the rest of the fence. Repeat the process for the remaining panels, making sure that they are all evenly spaced and attached securely.

If your fence will include a gate, it’s a good idea to install the gate posts now as well. This will make the gate much easier to open and close. Depending on the type of gate you are installing, this may require dedicated gate posts or the use of your existing posts. Once the gates have been installed, it’s a good idea to apply a weatherproof sealant to prevent moisture from damaging the wood.

Before starting work on the fence, it’s a good idea to check local building codes and regulations regarding fence installations in your area. Some neighborhoods or municipalities may have specific height restrictions, setback requirements, and materials guidelines that need to be followed.

This is an important step to complete before beginning construction because failure to do so could result in fines or the forced removal of your new fence. It’s also important to obtain any necessary permits before commencing construction on the project. This will ensure that the fence installation is completed according to state and local regulations and will not pose any safety hazards. A permit will also help to avoid potential delays in completing the project.

Navigation